Using Poly
Everything you need to use Poly in one place: installation, MIDI routing, the plugin interface, DAW workflow, scenes, capture, and troubleshooting. The chapters in this guide explore each rhythmic tradition in depth — this page covers the instrument itself.
Getting Started
Section titled “Getting Started”Install
Section titled “Install”Poly ships in two formats: a VST3 (all platforms) and an Audio Unit (macOS only). Both wrap the same engine — pick whichever your DAW prefers. Logic Pro only loads Audio Units, so macOS Logic users need the .component.
VST3 — copy the Poly.vst3 bundle to your system’s VST3 plugin folder:
- macOS:
~/Library/Audio/Plug-Ins/VST3/ - Windows:
C:\Program Files\Common Files\VST3\
Audio Unit (macOS) — copy the Poly.component bundle to your Components folder:
- macOS:
~/Library/Audio/Plug-Ins/Components/
The Audio Unit is an AUv2 instrument (aumu music-device) that wraps the VST3, exposing the identical engine to AU hosts. It registers under the manufacturer jk.digital as Poly.
Restart your DAW so it rescans for new plugins. On macOS, if a freshly installed AU does not appear in Logic, quit Logic and run killall -9 AudioComponentRegistrar in Terminal to force the system to re-scan the Components folder, then relaunch.
Build from Source
Section titled “Build from Source”Prebuilt binaries aside, both formats build from the repository with CMake. The VST3 builds on any platform with the standard Ninja configuration. The Audio Unit is macOS-only and requires the Xcode generator (the Steinberg AU wrapper is gated behind it):
# VST3 (all platforms)cmake -S . -B build -G Ninja -DCMAKE_BUILD_TYPE=Releasecmake --build build
# Audio Unit (macOS, Xcode generator required)cmake -S . -B build-au -G Xcode -DSMTG_ENABLE_AUV2_BUILDS=ONcmake --build build-au --config Release
The AU build emits Poly.component. Copy it into ~/Library/Audio/Plug-Ins/Components/ as described above.
Validate the Audio Unit with Apple’s auval tool, which loads the component end-to-end and confirms the host will accept it:
auval -v aumu Poly JkDlA clean run ends in * * PASS. The four-character codes are Poly’s AU identity: type aumu (music device / instrument), subtype Poly, manufacturer JkDl. If auval reports the component is not found, re-run killall -9 AudioComponentRegistrar and try again — the AU registry caches aggressively.
Load Poly
Section titled “Load Poly”Add an instrument track with Poly as the instrument:
- Cubase: Project > Add Track > Instrument > select Poly
- Logic Pro: Track > New Software Instrument Track > select Poly from AU Instruments
- Ableton Live: Drop Poly onto a MIDI track from the Plug-ins browser
- Studio One: Add Instrument Track > select Poly from the instrument list
- FL Studio: Channel Rack > Add Plugin > select Poly (VST3)
Poly generates MIDI only — it produces no audio on its own. You need a drum sound source (Groove Agent, Battery, Kontakt, Drum Rack, or any GM-compatible drum plugin) to hear the output.
Route MIDI to a Drum Instrument
Section titled “Route MIDI to a Drum Instrument”Option A — MIDI Send (recommended)
- Select the Poly instrument track
- In the Inspector, open MIDI Sends
- Enable a send and route it to the target drum instrument’s MIDI input
- The drum instrument receives Poly’s generated notes in real time
Option B — Record then route
- Record Poly’s output to a MIDI part (see Recording below)
- Move or copy the MIDI part to the drum instrument track
- This gives full editing control before the notes reach the instrument
Monitor configuration: enable Monitor on the Poly track to hear generated output during playback. If using MIDI sends, monitor the drum instrument track instead. Set MIDI Thru in Preferences > MIDI if needed for real-time monitoring.
Press Play
Section titled “Press Play”Hit play in your DAW. The lane phase indicators animate and you hear the groove through your drum instrument. The output is deterministic — the same settings always produce the same result.
The Plugin Interface
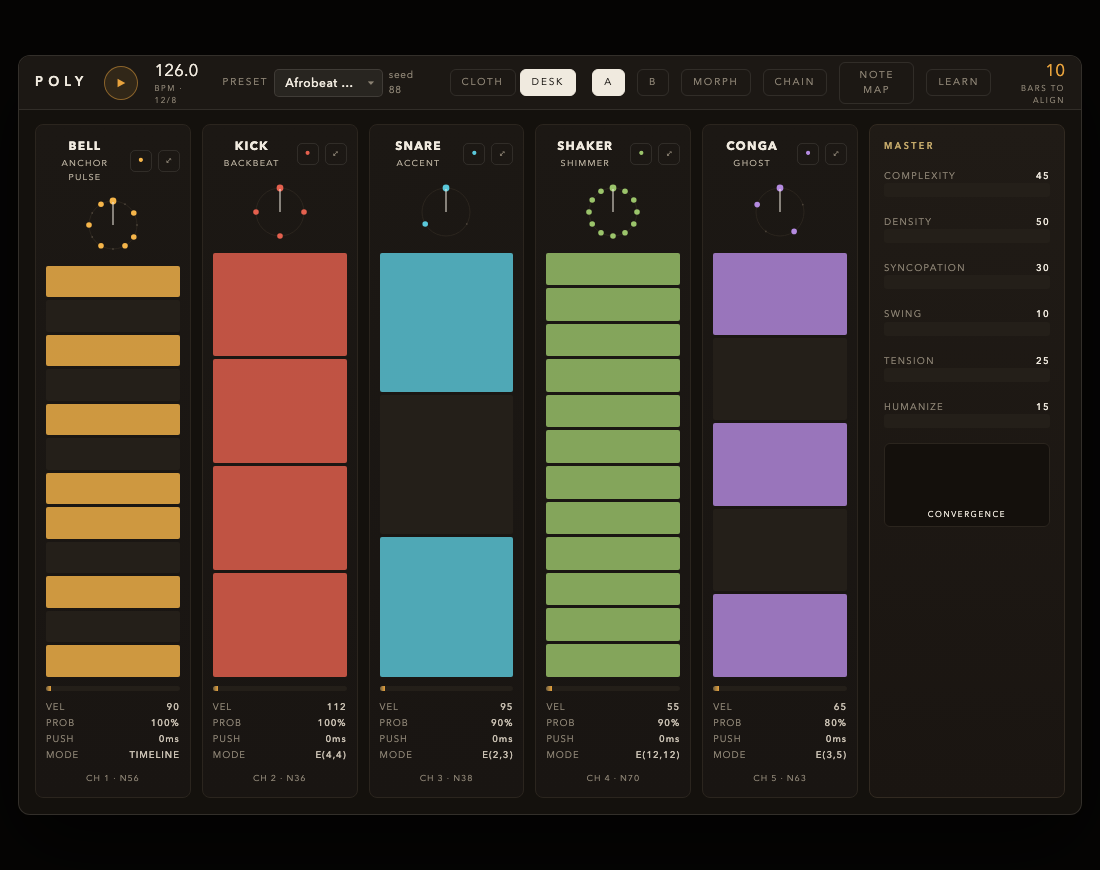
Section titled “The Plugin Interface”The interface has a header bar across the top, lane columns filling the main area, and a master panel on the right.
Header
Section titled “Header”Displays the plugin name POLY, a play button, BPM and time signature, and a preset selector dropdown. To the right: Cloth/Desk mode toggle (Cloth shows lanes as horizontal rows, Desk as vertical columns), A/B/Morph/Chain scene controls, Note Map and Learn buttons, and the bars-to-align counter. Click the preset dropdown to access Init (All Lanes) and all factory presets. Selecting any entry immediately loads all parameters.
Scene controls are in the header: A/B select which scene is active, Morph enables crossfading between them (a slider appears to blend A and B), and Chain opens the chain configuration popover (see Scene Chaining).
Lane Columns
Section titled “Lane Columns”Up to eight drum lanes, each representing an independent rhythmic voice. In Desk mode (shown above), each lane is a vertical column. In Cloth mode, lanes are horizontal rows. Both modes show the same controls.
Default MIDI note assignments:
| Lane | Name | Default MIDI Note |
|---|---|---|
| L1 | Kick | C1 (36) |
| L2 | Snare | D1 (38) |
| L3 | HH Closed | F#1 (42) |
| L4 | HH Open | A1 (45) |
| L5 | Tom Hi | A#1 (46) |
| L6 | Tom Lo | D#1 (39) |
| L7 | Ride | G1 (43) |
| L8 | Crash | D2 (50) |
Each lane shows:
- Name and role — the lane name (e.g., “BELL”) and its rhythmic role (e.g., “ANCHOR PULSE”). Click the lane name to toggle it on/off.
- Euclidean circle — a ring of dots showing the rhythm pattern. Filled dots are active hits; the rotating marker shows the current playback position. Each lane can have a different cycle length, so they rotate at different speeds.
- Step cells — colored blocks representing each beat in the pattern. The color matches the lane’s accent color. Brighter cells are active hits; darker cells are rests.
- Lane parameters — at the bottom of each column: VEL (velocity), PROB (probability that each note triggers, 0–100%), PUSH (timing offset in ms), and MODE (Euclidean distribution or timeline).
- Channel and note — MIDI channel and note number assignment for the lane.
Master Panel
Section titled “Master Panel”The right-hand panel contains global controls.
Macro sliders shape the overall groove character — six horizontal sliders that influence multiple engine parameters at once:
| Macro | Default | Effect |
|---|---|---|
| Complexity | 50 | Increases rhythmic intricacy across all lanes |
| Density | 50 | Controls how many hits are active in the pattern |
| Syncopation | 0 | Shifts emphasis away from strong beats |
| Swing | 0 | Applies swing feel globally |
| Tension | 0 | Increases rhythmic unpredictability and conflict |
| Humanize | 0 | Adds timing and velocity imperfections globally |
Click and drag any slider to adjust. Start with Density and Swing — they have the most immediate impact on the feel.
Convergence display — below the macro sliders, a visualization showing how the independent lane cycles relate. When lanes align (converge), downbeats coincide and the groove locks in. When they diverge, the polymetric pattern reaches maximum complexity. This is the key visualization for Poly’s core concept: independent rhythmic cycles drifting in and out of alignment.
Hidden Parameters
Section titled “Hidden Parameters”These parameters are not visible in the plugin UI but are exposed for DAW automation:
| Parameter | Range | Purpose |
|---|---|---|
| Base Velocity | 0–127 | Default velocity for notes in a lane |
| Emphasis Prob | 0–100% | Probability of accented hits |
| Ghost Floor | 0–127 | Minimum velocity for ghost notes |
| Velocity Spread | 0–100% | Random velocity variation |
| Swing Amount | 0–100% | Per-lane swing feel |
| Humanize | 0–50 ms | Per-lane random timing offset |
| Note Duration | 0–4 beats | Length of MIDI notes |
| Tempo Mult | 0.25x–4.0x | Per-lane tempo scaling (see Metric Modulation) |
| Active Lane Count | 1–8 | Number of active lanes (ID 300) |
| Seed | 0–999999 | Random seed for pattern generation (ID 301) |
See the Parameter Reference for the complete parameter list with IDs and ranges.
MIDI Routing
Section titled “MIDI Routing”Single-Instrument Setup (Default)
Section titled “Single-Instrument Setup (Default)”All lanes on the same channel: set every lane’s MIDI channel to 0 (or leave on Auto). All notes flow to a single drum kit. This is how the factory presets work — one instrument receives everything, and the kit mapping within that instrument determines what each MIDI note sounds like.
Multi-Instrument Setup
Section titled “Multi-Instrument Setup”Assign lanes to different MIDI channels to drive separate instruments from a single Poly instance.
| Lane | Role | Note | MIDI Ch | Target |
|---|---|---|---|---|
| 1 | Kick | 36 | 0 | Groove Agent (acoustic kit) |
| 2 | Snare | 38 | 0 | Groove Agent (acoustic kit) |
| 3 | Hi-hat | 42 | 1 | Battery (electronic kit) |
| 4 | Perc | 63 | 2 | Kontakt (world percussion) |
With separate instruments on separate channels, you get independent mixing, processing, and spatial positioning for each timbral layer.
Multi-Channel Routing by DAW
Section titled “Multi-Channel Routing by DAW”Cubase:
- Set Poly’s MIDI output to All MIDI Channels in the instrument track’s output routing
- Create instrument tracks for each target (Groove Agent, Battery, Kontakt, etc.)
- Set each target track’s MIDI input to Poly with channel filtering matching the lanes you want
Logic Pro:
- Create an External Instrument or Software Instrument for each target
- Use the MIDI Environment or MIDI FX to split channels from Poly’s output to separate instruments
Ableton Live:
- Place Poly on a MIDI track
- Create additional MIDI tracks, each with MIDI From set to the Poly track
- Set the channel filter on each receiving track to match Poly’s lane channels
Studio One:
- Use Note FX or MIDI channel routing on Poly’s instrument track
- Create instrument tracks for each target and route by channel
FL Studio:
- Set Poly’s MIDI output port in the plugin wrapper
- Link receiving instruments to the same port with channel filtering
In all DAWs, each target track receives only its assigned lanes’ notes — no cross-talk between instruments.
Note Map
Section titled “Note Map”The Note Map is a 128-entry remapping grid that transforms MIDI note numbers before they reach the output. By default, it is an identity map (every note passes through unchanged). Remap any source note to any destination to match non-standard kit layouts, create octave layers, or route lanes to pitched instruments.
The NoteMapView editor in Poly’s UI displays each active lane’s source note, its GM drum name, and the current destination. Click any destination to change it. A Reset button restores the identity mapping.
Practical examples:
- Kit swap — remap 36→48, 38→52 to match a non-standard drum machine layout without changing your patch
- Octave layer — map kick 36→48 so hits trigger both the original and layered sample
- Melodic percussion — remap lane notes to pitched instruments (marimba, steel drum) for tonal polyrhythmic melodies
Playback and Transport
Section titled “Playback and Transport”Poly derives all timing from the DAW transport. Everything is PPQ-based, so transport operations work without drift:
- Play — generates notes based on current PPQ position
- Stop — output ceases immediately
- Loop — seamless; Poly recalculates from the loop-start position
- Tempo changes — take effect immediately
- Position jumps — correct output from the new position (no accumulated state to reset)
Identical transport playback produces identical MIDI output every time. Poly’s output is a pure function of the patch settings and transport position. Changing the block size or buffer settings does not affect the musical result.
Scene Chaining
Section titled “Scene Chaining”Scene chaining automates transitions between Scene A and Scene B at bar boundaries, removing the need to manually automate the Scene Select parameter.
Chain Configuration
Section titled “Chain Configuration”Click the CHAIN button in the scene bar to open the chain popover:
- Enable toggle — ON/OFF to activate chain playback
- Mode selector — behavior at the end of the sequence:
- 1-Shot — stops at the last entry and holds it
- Loop — wraps back to the first entry and repeats
- PingPong — reverses direction at each boundary (A-B-A-B…)
- Entry list — up to 16 entries, each with a scene (A/B/Morph) and bar count (1–32)
- Add / Remove — manage entries
Example: A-B-A Structure
Section titled “Example: A-B-A Structure”| Entry | Scene | Bars |
|---|---|---|
| 1 | A | 8 |
| 2 | B | 8 |
| 3 | A | 8 |
With 1-Shot, the chain plays 24 bars and holds the last entry. With Loop, it repeats indefinitely. With PingPong, it reverses: A-B-A-B-A…
Chain position resets on transport jumps. Chain advances only at bar boundaries — mid-bar starts wait for the next bar line.
Time Signature and Bar Counts
Section titled “Time Signature and Bar Counts”“Bar” throughout Poly means the host’s bar. If your DAW project is in 7/8, a chain entry with bars=2 runs for 2 × 7/8 (7 PPQ) — not for 2 × 4/4 (8 PPQ). The same rule holds for envelope Period Bars and the “last N bars” MIDI capture window. Poly’s header displays the current host time signature next to BPM so the coupling is visible at a glance — if you see 120 BPM · 7/8, every “bar” in the UI is a 7/8 bar.
Individual lane cycles are meter-independent by design. A lane with steps=7, subdivision=8 always cycles every 7/8 regardless of what the host meter says. The host meter only affects UI-facing “bar” counts (scene chain length, envelope period, capture window), never the underlying rhythmic grid. This is what makes true polymeter work: a 7/8 lane can play against a 4/4 host, or vice versa, and both stay musically coherent.
If you’re writing music in an unusual meter (aksak 9/8, tala, Balkan 11/8), set your DAW’s project time signature to match — Poly will follow. Time-signature changes mid-project take effect on the next block; there is no per-project “master meter” parameter today (a possible future addition if the host-as-authority coupling proves painful).
Metric Modulation
Section titled “Metric Modulation”Each lane has a Tempo Mult parameter that scales its step grid independently from the host tempo.
| Multiplier | Effect |
|---|---|
| 0.25x | Quarter speed — 4x longer between hits |
| 0.5x | Half speed |
| 1.0x | Normal — follows host tempo |
| 2.0x | Double speed |
| 4.0x | Quadruple speed |
Start with simple ratios: 2.0x against 1.0x creates a 2:1 tempo relationship. 1.5x against 1.0x creates a 3:2 hemiola. Phrase gating stays in absolute PPQ (unscaled), so gating boundaries remain bar-aligned regardless of the multiplier. Scene morphing interpolates the multiplier smoothly.
Recording
Section titled “Recording”Record MIDI Output
Section titled “Record MIDI Output”- Arm the Poly track for recording
- Press Record in the transport
- Poly’s generated events are captured as a standard MIDI part
- Stop recording — the part appears in the arrangement
Record to a Separate Track
Section titled “Record to a Separate Track”- Create an empty MIDI track
- Set its input to Poly
- Arm the MIDI track for recording
- The MIDI track captures Poly’s output independently
Loop Recording
Section titled “Loop Recording”Most DAWs support loop recording with Poly:
- Mix / Overdub — each pass adds to the same region (layered takes). Called Mix in Cubase, Overdub in Logic, and Overdub in Ableton.
- Replace — each pass overwrites the previous take.
Since Poly is deterministic, Replace mode produces identical content each pass unless you change parameters between passes.
Editing Recorded MIDI
Section titled “Editing Recorded MIDI”After recording, the MIDI region is standard data: open it in your DAW’s piano roll or drum editor, quantize, transpose, or process with any MIDI function. The recorded MIDI is fully independent of Poly.
MIDI Capture and Export
Section titled “MIDI Capture and Export”Poly continuously records every note it generates into a circular buffer holding the most recent 2048 events (roughly 8 bars at typical density). No arming or configuration needed — the buffer captures automatically during playback.
Export Workflow
Section titled “Export Workflow”- Play until you hear a passage worth keeping
- Set Capture Length to match the passage (1–32 bars, default 8)
- Trigger Export — Poly writes a Standard MIDI File (Type 0, 480 ticks/quarter)
- Import the
.midfile into your DAW as a standard MIDI part
The export preserves all MIDI channels, velocities, and micro-timing from Humanize and Swing. The captured material is completely independent of Poly — edit it, layer it, rearrange it.
Capture is especially powerful during scene morphs, where the groove transforms continuously. Exporting during a morph captures that transition as concrete MIDI data.
Parameter Automation
Section titled “Parameter Automation”Poly exposes all macro knobs, scene controls, chain parameters, per-lane settings, and metric modulation values to the DAW automation system. Show automation lanes on the Poly track and draw curves or record automation moves.
Automation and scene chain
Section titled “Automation and scene chain”Today, host automation lanes target the currently selected scene rather than a specific scene. During Scene Chain playback the active scene rotates automatically at bar boundaries, so a single automation curve will silently retarget Scene A vs Scene B across a chain cycle. If you need a curve to control one scene only, disable Scene Chain and set the scene manually while recording that automation. A future release will give each scene its own automation namespace so per-scene curves work under chain playback without this workaround (tracked as milestone M067).
Preset Management
Section titled “Preset Management”Factory Presets
Section titled “Factory Presets”| # | Name | Style | Active Lanes |
|---|---|---|---|
| — | Init (All Lanes) | Default state, all 8 lanes active | 8 |
| 1 | Four on the Floor | Classic club groove with straight 8th hats | 4 |
| 2 | Polymetric Drift | Prime-number cycles (3, 5, 7, 11) | 4 |
| 3 | Sparse Pulse | Minimal, spacious groove | 3 |
| 4 | Breakbeat | Syncopated kick with fast hats | 4 |
| 5 | Latin Feel | Clave-inspired with percussion | 4 |
| 6 | Afro-House Phrases | Staggered phrase loops | 5 |
| 7 | Reich Phasing | Two identical patterns phasing apart | 3 |
| 8 | Kotekan Interlock | Balinese interlocking pair | 4 |
| 9 | Pocket Groove | J Dilla-style micro-timing | 4 |
| 10 | Afrobeat 12/8 | Compound-time with timeline bell | 5 |
| 11 | Balkan Aksak | 7/8 aksak [2+2+3] | 4 |
| 12 | Bossa Nova | Clave timeline with ginga micro-timing | 4 |
| 13 | Carnatic Tala | Adi tala [4+2+2] | 4 |
| 14 | IDM Glitch | Irregular additive cells | 5 |
| 15 | Sub-Saharan: Agbekor | Ewe polymetric ensemble with bell timeline | 4 |
| 16 | Gamelan: Colotomic | Javanese colotomic nesting at 4:8:16:32 | 4 |
Save and Load
Section titled “Save and Load”Save presets via the preset selector dropdown in the header bar, or use your DAW’s preset manager (.vstpreset files). Presets saved with older versions load correctly in newer versions — Poly uses versioned state serialization and migrates forward automatically.
Following the Chapter Examples
Section titled “Following the Chapter Examples”Each chapter in this guide includes patch recipes — teal-highlighted boxes with lane-by-lane parameter tables. To hear any chapter’s examples:
- Open Poly and load the factory preset named in the recipe (or start from Init)
- Set the lane parameters as shown in the recipe’s table (steps, hits, rotation, subdivision, note assignment)
- Route MIDI to a drum instrument as described in Getting Started
- Press play — the rhythmic tradition described in the chapter plays through your drum kit
Most recipes build on the factory presets. If a recipe says “Start from Afrobeat 12/8,” load that preset first, then apply the modifications listed. If it says “Custom,” build from the Init preset.
The chapters progress from foundational concepts (Euclidean distribution, cycle independence) through regional traditions (Sub-Saharan Africa, Afro-Cuban, Gamelan, Indian classical) to synthesis techniques that combine multiple traditions. You can read linearly or jump to any chapter — each is self-contained.
Troubleshooting
Section titled “Troubleshooting”| Symptom | Cause | Fix |
|---|---|---|
| No sound | MIDI not routed to drum instrument | Check MIDI send or recording workflow |
| Notes cut off at loop point | Expected — Poly recalculates from loop start | Correct deterministic behavior |
| Different output after restart | Patch seed changed | Verify seed in patch settings |
| High CPU | Many active lanes with short subdivisions | Reduce active lane count or increase subdivision |
| Missing notes | kMaxEventsPerBlock exceeded |
Reduce lanes or density |
| Chain not advancing | Chain Enable is Off | Set Chain Enable to On in the chain popover |
| Chain resets on seek | Expected behavior | Chain position resets on transport jumps |
| Lane too fast or slow | Tempo Mult not at 1.0x | Check per-lane Tempo Mult in automation |
Preview audio uses CC0 and CC-BY drum samples. Every sample is credited on theCredits & Licenses page.